
Microsoft Excel 2013 has a very handy ‘Find & Replace’ function that is useful for both locating certain text strings within your worksheet, and optionally, replacing those strings with different strings if you need to. This functionality can be very useful if you are working on a large spreadsheet with many rows or columns.
To access the the Find & Replace feature, select the ‘Home‘ tab, and select the ‘Find & Select‘ button from the ribbon. Alternatively you can press ‘Ctrl+F‘ to display the Find & Replace dialog.

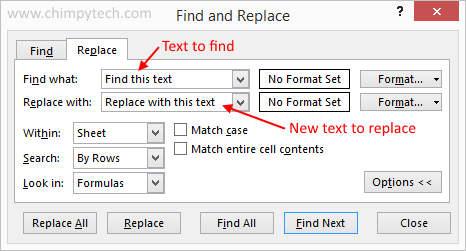
Once you have made your selection you will see the Find and Replace dialog below.

The ‘Find’ tab will be activated by default, but if you wish to replace text, you will need to activate the ‘Replace’ tab to see the screen below.
The options are generally the same no matter which dialog box you are using, so we can deal with them all in one go.
- Within: This is where you specify where the search should be, either in the current Worksheet, or the entire Workbook.
- Search: Here you can specify the internal search method, i.e. search by rows or columns.
- Look in: If you wish to include the text in fumulas then select this option.
- Match Case: To match the case in thsearch i.e. match lower case match with lower case, and upper with upper, tick this box.
- Match Entire Cell Contents: If you want to exact match of the word with the cell then check this option.