Excel 2013 – Spell Checking
There is nothing that will make a well structured and smart looking Workbook look bad like poor spelling.
Fortunately, just like it’s cousin ‘Word’, Microsoft Excel includes a comprehensive and expandable spell checking tool to help you take all the hassle out of checking your Workbooks.
To access the spell checking tool you can do it one of two ways
- Open the ‘Review‘ tab and select the ‘Spelling‘ option at the far left.
- On any active sheet you want to spell check hit the ‘F7’ key
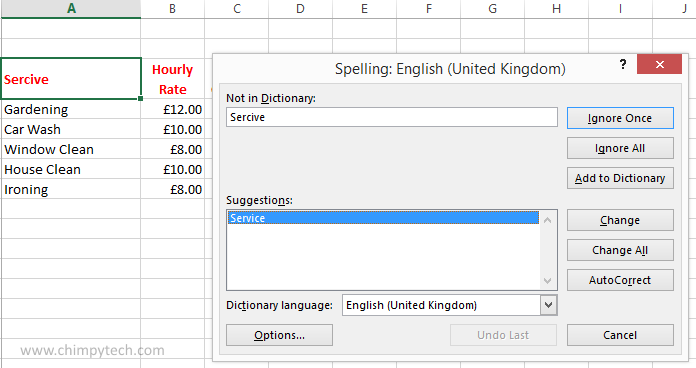
The Spell Checking algorithm will now run and check the spelling in all of your cells – if it finds a problem with a word that it believes to be miss-spelled then you will see the dialog box below.
Once the spell checking dialog is displayed you have a number of different options that you can take:
- Ignore Once: Ignore only this occurrence of the spelling mistake
- Ignore All: Ignore all occurrence of this spelling mistake
- Add to Dictionary: Use this when it’s actually the correct spelling but the word isn’t in the dictionary. Not every word is in the dictionary, so you may use a word that it doesn’t know.
- Change: Replace the mis-spelling with the suggested word for this occurrence only.
- Change All: Replace all identical mis-spellings with the suggested word.
- AutoCorrect: Similar to ‘Add to Dictionary’ but in future will also automatically correct the mis-spelling with the suggested word.
If at any time you want to stop the spell check you only need to click on the ‘Cancel’ button.
← Excel Find and Replace function