Assorted Small Tips For Word 2003
A whole host of useful tips for Microsoft Word that don’t fit anywhere else!
Customising AutoText
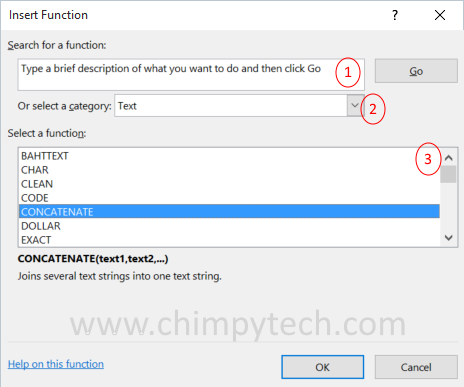
AutoText can be customised to insert any word or phrase that you frequently type. Type the word or phrase you want into any document and highlight it with the cursor. Next select the Insert menu, select AutoText and ‘New’. You will need to name your AutoText entry, then click ‘OK’. Now when you start to enter your phrase you will be able to complete it by hitting the ‘F3’ key when prompted.
Creating Booklets
To create sufficient space in the margins of your document to allow for binding or hole punching etc., use the ‘Mirror Margins’ option in the page setup menu. Remember to set the gutter position to ‘left’. Experiment until you find the correct width for your margin, but somewhere around 1cm should be enough.
Once you have formatted your document, you will need to print it out, and assuming you have used the formatting above you will need to print double sided. Unless you are lucky enough to have a printer with a duplexing facility you will have to organise double sided printing yourself, however this is pretty easy with Word. Open the print dialog, and select the option ‘Odd pages only’ and print your document. Once it’s printed, re-load the paper, and print now with ‘Even pages only’ and you will now have a booklet ready for binding. (Depending on how your printer / OS is set up, you may have to reverse the printing order on one of the print runs)
Extending AutoText Entries
To add your selections to Words ‘AutoText’ list, simply type in the word or phrase you want to add, then select it by highlighting it with the mouse. Go to the ‘Insert’ menu, select ‘AutoText’ and ‘New’ when prompted, enter a name for your AutoText entry and click ‘OK’
Your AutoText entry will now appear in your document in the current styles, however, if you want your auto text entry to appear in a particular fashion it is also possible to achieve this. Once you have typed your phrase, switch on the option to see formatting marks. Select your text AND the end of paragraph mark immediately after your text. Now set text options such as colour, font size etc. Next just follow the instructions from the ‘Insert’ menu part above.
Speed Up Editing Of Large Documents
If you have a large document that contains a few graphics, maybe some charts or photo’s, editing the document may start to become a slow laborious process after a while, especially if you’re not using a high spec PC. To speed things up, switch off the viewing of images whilst editing. Choose ‘Tools’, ‘Options’, and ‘Picture Placeholders’, images will no longer be visible, but are still contained within your document.
Word Count
Writing a thesis or essay where there is a minimum or maximum number of words you can have in or finished document? Let Word count them for you, in early versions of Word you can perform a word count by pressing ‘Alt’ T, then W. In versions of Word from 2002 onward there is a word count toolbar that can be viewed by selecting it from the Toolbars menu.
Keep Confidential Information Safe
Word has a built in option for keeping prying eyes away from the confidential information in your documents. When you save your document, select ‘Save As’, when the file selector box appears select the ‘Tools’ drop down list, and select ‘Security Options’ from the list. Use the dialog to select the options you require.
Move Buttons
Moving buttons around so that your toolbars are exactly how you want them is easy, hold down the ‘ALT’ key, click and hold on the button you wish to move, and then just drag the button to its new location