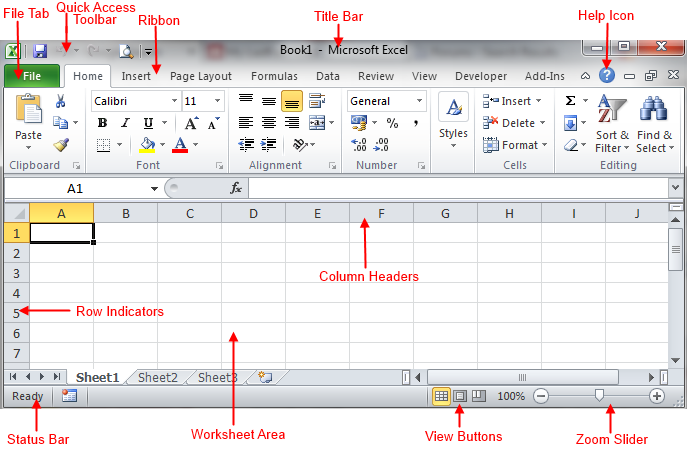
When you start up Microsoft Excel 2010 for the first time you will see a screen similar to the one below.
Before we start the tutorials in earnest we should look at all the main areas of the screen and how they interact with each other.
Title Bar
This area of the screen shows the name of the file you are working on, and which of the Office applications you are working in.
File Tab
With the introduction of Office 2010 Microsoft replaced the Office button with the File tab. This houses the Backstage view which is the new place to access all the file related operations, and printing options as well as a whole bunch of settings and options.
Quick Access Toolbar
As its name suggests, this is a toolbar which the user can customise to provide access to some of Excels most frequently used commands.
Ribbon
The Ribbon contains all the commands used to manipulate your spreadsheet, and is broken down into three areas.
- Tabs: These appear across the top of the Ribbon, and group related functions together, Home, Insert, Page Layout and Formulas are all examples of tabs.
- Groups: These organise the related commands of a particular tab, Font, Alignment, and Number are all command groups, and the name of each group is displayed below the group.
- Commands: These are the individual actions contained within each group such as Font Colour, Text Alignment, and Border Selection.
Help
This icon provides access to Microsofts built in help files, it also provides access to the online Microsoft help pages.
Status Bar
The Status Bar displays useful information about your worksheet such the insertion point location and total number of pages amongst other things – right clicking the Status Bar will display a menu allowing you to customise what is displayed.
Worksheet Area
This is the main work area of your spreadsheet and contains all the data, formulas, and labels that comprise your finished spreadsheet.
View Buttons
This is a group of three buttons that allows you to switch between Excels three sheet views.
- Normal Layout view: This is the normal standard default view.
- Page Layout view: This display the pages exactly as they will appear when printed.
- Page Break view: This shows a preview of where pages will break when printed.
Zoom Slider
This slider allows you to zoom in to your document to see text etc in greater detail, or out to get a good overview of a large worksheet. If you don’t like the slider you can use the + and – buttons to do the same thing.
Column Headers
This is an indicator of which column you are working on, columns will be automatically added to the worksheet as you need them up to the maximum of 16,384 columns. They are numbered from A-Z, and after that AA, AB, AC etc.
Row Indicators
This is an indicator of which row you are working on, and as with columns, rows will be automatically added to the sheet as you need them up to the maximum of 1,048,576 and are numbered from 1 onwards.

