Excel 2013 – Deleting & Moving Data
There are many times when you will need to either delete data or move it to a new location within the current Worksheet or Workbook.
Before you read through this we recommend that you first read our tutorial on Selecting Data as this will make deleting the data a whole lot easier.
One you have selected your data using whichever method is most suitable for your situation there are a few way to delete it.
Deleting the contents of cells.
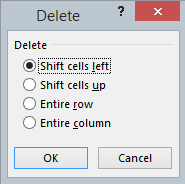
Once you have selected the cells you wish to delete, simply right click anywhere in the selection and select ‘Delete’ from the drop down menu.
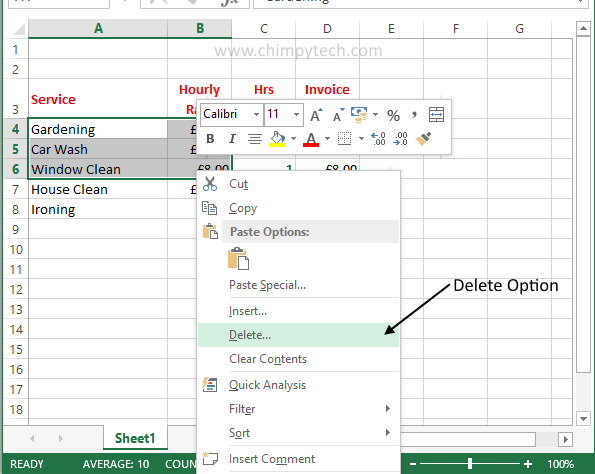
This will not just delete the contents of the cells, but the entire cells themselves, so you will need to decide from the dialog box below how you wish the cells around the deleted area to move.
Because Deleting Cells causes the other cells around the deleted area to move, it is quite possible that some links and formula references could be broken with the change in cells. For this reason we would suggest fro most users who just wish to delete the contents of the cells, and not the structure of the work book itself, the best option is to use the ‘Clear Contents’ feature immediately below the ‘Delete’ option.
Moving Data
If your aim is to copy or move your cells / data to a new location, the technique is very similar:
- Select the data you wish to copy / move
- Right click the cell you want to paste it in to (if you have selected a block of cells, the cell you Right click in should be the top left cell of the destination block)
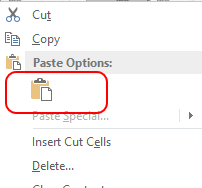
- Select the ‘Paste’ option shown in the graphic below.
 This will paste in your cells in to their new destinations, and change any formulae as necessary.
There are a few other paste options available, and you will often see a block of possible options shown below.
- Paste – this is the option as mentioned above.
- Paste Values – This will paste only the values from the copied cells, it removes all formulae and formatting.
- Paste Formulas – This will paste the values and formulas, but removes all formatting.
- Paste Transpose – Changes the orientation of the copied range. Rows become columns, and columns become rows. Any formulas in the copied range are adjusted so that they work properly when transposed.
- Paste Formatting – Copies only the formatting of the source range.
- Paste Link – Creates a copy of the original range, and links the new range to the original so that changes in the original range are reflected in the new range.