When you delete a file from your PC in Microsoft Windows it isn’t usually really deleted, merely placed in the recycle bin, just in case you suddenly decide you have made a mistake and want to get the file back.
While this is quite convenient, it can also be a security threat, as anyone with physical access to your PC could retrieve files that a user thinks has actually been deleted.
With very little work, it is possible to set your re-cycle bin to automatically and permanently delete files that you send to the recycle bin using the procedure below.
1. Right click on the ‘Recycle Bin’ icon on the desktop, and select Properties from the context menu.
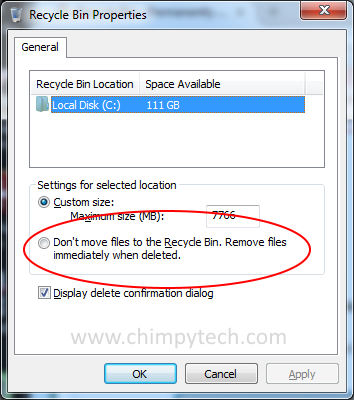
2. In the Properties dialog select the drive you wish to change the recycle bin for (each drive has it’s own Recycle Bin)
3. Near the bottom of dialog box there is an entry marked ‘Don’t move files to the Recycle Bin. Remove files immediately when deleted’ click the radio button to select it. (The ‘Custom Size‘ button will deselect)
All files sent to the Recycle Bin will now be permanently deleted – If you are feeling really brave, you can also untick the box marked ‘Display delete confirmation dialog’ to bypass that step when deleting files. If you have multiple drives repat the about process for each drive, selecting the correct one in step 1

If at any time you wish to make the Recycle Bin act in the default manner, simply repeat the above steps, but at step 3 select the option for ‘Custom Size‘
