Windows 10 Aero Snap – Turn on and off
Aero Snap was a feature first introduced in Windows Vista, and has been refined in subsequent Windows versions.
Aero Snap feature is one that many users will like as it will allow them to organise multiple Windows on screen very easily. However, as with most features, not everyone will like it. Fortunately it’s quite easy to switch this feature off and back on again, if you want to. By default Windows 10 Aero snap is turned on.
For more information about how the Windows 10 Aero Snap feature works please see our separate article – Windows 10 Aero Snap Improvements.
Turning Aero Snap on and off in the Settings Applet
- Open the Start menu and click the ‘Settings’ button.
- Select the ‘System’ applet, and open the ‘Multitasking’ option in the left hand pane.
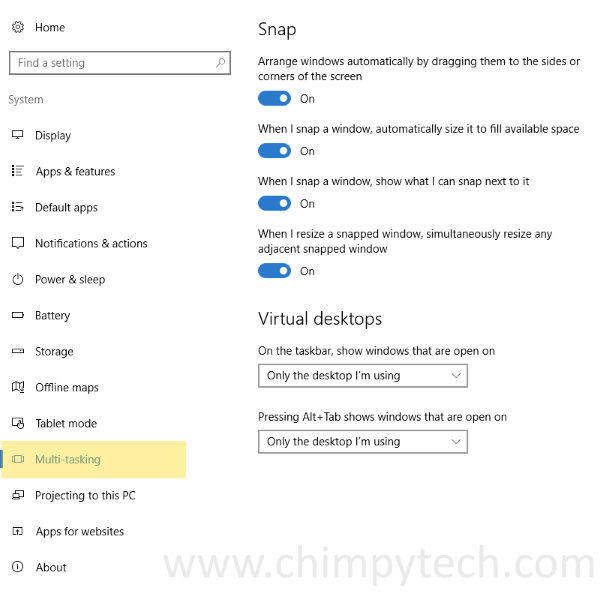
- Under the ‘Snap’ heading you will see four different options for controlling Aero Snap. Switching them all to ‘Off’ will disable Aero Snap completely. If you want to leave Aero Snap on, then using the on / off toggles will allow you to tweak it’s usage to your taste.
Turning Aero Snap on and off in Ease of Access Center
- Click the Start button and begin to type in ‘Ease of Access’ in the search box.
- When you see the option for the ‘Ease of Access Centre Control Panel’ applet in the results click on it to open.
- Look down the list of options until you see one marked ‘Make the mouse easier to use’, and click to open.*

- Find the option ‘Prevent windows from being automatically arranged when moved to the edge of the screen’.
- Ticking this option turns off Aero Snap, Unticking will of course turn it back on again.
* You can also click on the options ‘Make the keyboard easier to use’ and ‘Make it easier to focus on tasks’ to find the ‘Prevent windows from being automatically arranged when moved to the edge of the screen’ tick box.