Knowing the best techniques for navigating Excel 2013 worksheets can save the average user a huge amount of time. Once you entered some data into your worksheet you will now need to know some of the best ways to navigate around the sheet as your data is likely to take up more space than you can see on screen. (Unless you have a very small worksheet, or very large monitor of course.)
Moving With The Mouse and Scroll Bars
Assuming your data stretches off screen, one of the easiest ways to move around your worksheet is by using the mouse – If you need to move the insertion pointer to a new place that you can see on screen, simply point to place where you want to move to and click the left button.
If however, your sheet stretches off-screen, and you want to navigate to something you cant see there are a couple of ways to do it using the mouse
- Using the scroll wheel – if your mouse has a wheel, then you can use it to scroll your sheet up and down, and if you have a tilt enabled wheel you may be able to scroll left and right.
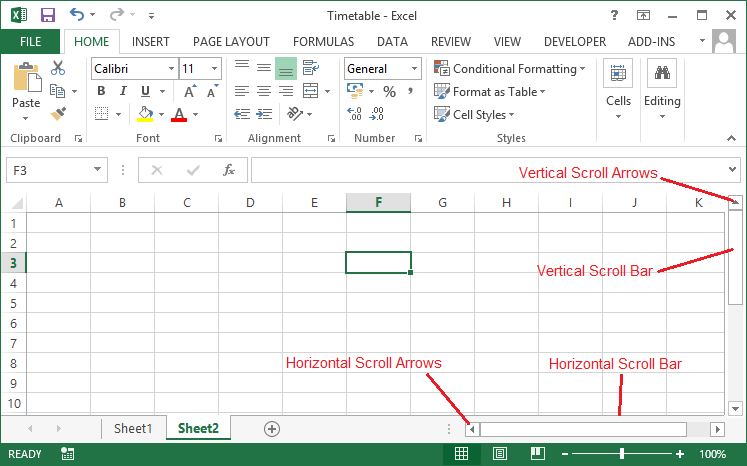
- Using the scroll bars / arrows – in the screen shot below you will see some pointers to to the scroll bars / arrows. If you want to move your worksheet by large amounts, click, hold and drag the appropriate scroll bar to move, if you just want to move either a row or column at a time, simply click on the appropriate scroll arrow.

With The Keyboard
As any regular computer user will tell you the the mouse is fine, but for sheer speed you can’t beat using the keyboard, and as with most other programs navigating Excel will be easier if you master the following:
| Keystroke | Action |
|---|---|
| Up Arrow | Move Up One Cell |
| Down Arrow | Move Down One Cell |
| Left Arrow | Move Left One Cell |
| Right Arrow | Move Right One Cell |
| Page Up | Move To The Previous Screen |
| Page Down | Move To The Next Screen |
| Home | Move To The Beginning Of The Current Screen |
| End | Move To The End Of The Current Screen |
| [Ctrl]+Up Arrow | To The First Box In The Current Column Containing Data |
| [Ctrl]+Down Arrow | To The LastBox In The Current Column Containing Data |
| [Ctrl]+Left Arrow | To The First Box In The Current Row Containing Data |
| [Ctrl]+Right Arrow | To The Last Box In The Current Row Containing Data |
| [Ctrl]+Page Up | To The Active Cell In The Previous Worksheet |
| [Ctrl]+Page Down | To The Active Cell In The Next Worksheet |
| [Ctrl]+Home | To The Beginning Of The Sheet |
| [Ctrl]+End | To The End Of The Sheet |
With The GoTo Command
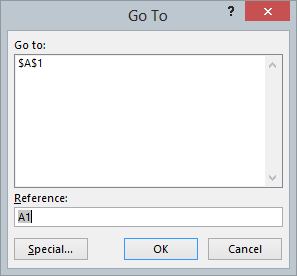
If you know exactly which cell you want to jump to, and it’s a long way away from the currently active cell then a good option is the GoTo command – Simply hit F5 to bring up the GoTo dialog box as shown below.
Then type the name of the cell you want to jump to in the ‘Reference’ line and click ‘OK’ and you will jump straight there – The upper section of the dialog labelled GoTo will display any recently used jumps, so if you do flip between multiple points regularly then it’s possible to click the one you want form that list.

